


In a couple of hours 2013 will be here and all I can think about is how much I did and didn't accomplish this year. Time just moves so quickly! While I have accomplished quite a few of my goals this year, I am anxious to move forward and accomplish even more.
An assortment of projects are underway and as I take them on, I plan to continue to learn, enjoy, and share them with you--in hopes that you will enjoy them too. I am excited to start a new year with my family and friends--Happy New Year!!!
Monday, December 31, 2012
Thursday, December 27, 2012
Giving to Someone Who Sews
Recently I participated in a Pincushion Swap through the quilt guild for which I belong and it was so much fun. Members who participated made their creations and swapped with members from our guild in Canada. Sewist and non-sewists alike know all to well that making something with your hands is very special, not only because of the skill involved but because of the time invested. So we all felt special giving and receiving.
Yesterday, I made a sewing caddy with matching pincushion for Kyla, who officially turned 10 today. For those who are new to my blog, Kyla is my sewing student and is an up and coming sewist that has just come to understand the added dimension of gift giving as a result of making and creating with her own hands. So because of my fun experience with the recent swap that I was a part of, I thought it would be nice to give her something hand-sewn and hopefully she would be just as delighted.
Kyla's home sewing space takes up a corner of her bedroom and the color scheme of her room is purple and aqua with zebra accents throughout. I happened to have had some fabric with a dress form motif that also picks up some of the colors of her room and her sewing desk, which is also purple. This should work out quite well?
The pattern I used was from a tutorial at howjoyful.com but the picture below is my slight variation of the pattern (the pincushion is slightly larger and different and securely pinned on instead of clipped on).


She will be getting her gift this evening; I hope she will like it. I can already see it on her desk underneath her sewing machine. I will let you know how she liked it.
Monday, December 24, 2012
Merry Christmas and Thank You
Merry Christmas family and friends! And thank you for visiting my blog throughout the year, and a special thank you to those who took the time to share your thoughts from time to time. For those who have visited my blog but haven't felt the need to comment just yet, please remember you are ALWAYS welcome to do so, as I would love your feedback. For me, it's your input that is the added element that encourages and inspires the creative process, especially for future projects, so keep them coming!
Thank you again,
Denise
Thank you again,
Denise
Sunday, December 23, 2012
This Elf is Ready for Wine
Check, check, check, and check! All the gifts I had planned to make are done, so now this little elf is officially ready for Christmas, and a glass of wine! Today was a very full day of shopping and sewing. Kyla (my sewing student) and I made her last three gifts: another mug rug, a soda/beer can koozie, and a small stuffed doll. Then after she left, I finished the wine koozies that I started last night. By the way, I found the cutest Cozy Wine Koozie recipe (pattern) on the Moda Bake Shop blog, which was featuring Becky's design at SewSaneJane. I really enjoy Becky's work. Check it out!
Anyway, these are the ones I made from her "recipe".

I've poured myself a glass of wine to celebrate, and I put wine bottles in the koozies for a few of my relatives and a friend.

Tomorrow will be a day of house cleaning and cooking prep, so once again, Merry Christmas!
Anyway, these are the ones I made from her "recipe".

I've poured myself a glass of wine to celebrate, and I put wine bottles in the koozies for a few of my relatives and a friend.

Tomorrow will be a day of house cleaning and cooking prep, so once again, Merry Christmas!
Thursday, December 20, 2012
Christmas Rush with Kyla
As adults, we seldom go through the Holidays without experiencing some bit of stress and anxiety due to the many, many things that are required of us because we are employees and/or heads of our households. We especially feel the demands of the Holidays when we're attending school programs, church events, going to dinners, and hosting our own gatherings. But during the hustle bustle, we sometimes forget that our children experience their own little stresses. Given their stresses may be "pint size" in the scheme of things, they are stresses nonetheless.
Last night, I was working with my sewing student, Kyla, who is working fervently to finish making her Christmas gifts. I realized then, and maybe before then, that kids want to achieve and succeed and accomplish and please to the point of challenging themselves just like adults. Kyla is 10 and developed an interest in sewing at 8. She's creative, ambitious, and enjoys sewing, and she always looks forward to the next project. Kyla is in her second session (year) of sewing with me, which obviously involves more of her input about things she would like to make. When Kyla came to me and told me that she wanted to make Christmas gifts this year, I was thrilled. Then Kyla showed me her list. I thought to myself--this girl is ambitious given the times we meet per week and the duration of our class--plus school, sports, student council, etc., etc. Her list included every member of her immediate family, grandparents, an aunt, her teacher, and her best friend. Well, I'm not one to squelch enthusiasm, so I spoke with her mother about her daughter's proposal/project, and we agreed to increase visits to the studio to make this happen. She would, of course, also have to work on these projects at home.
So last night while we were working together, I stopped and watched and realized that Kyla at age 10 is already doing what we adults do--doing as much as we can--sometimes because we have to AND sometimes because we want to--in order to achieve and to please--ourselves as well as others. GOALS are what they are--not a bad thing but it can be stressful! LOL. Her mother and I are delighted that she's taken to the art and craft of sewing, but more importantly that she's giving from her heart while doing so.

Tuesday, December 18, 2012
I'm Giving SUB's for Christmas
Their names are appliqued in their favorite colors on the center panels. The long side panels were made with a baseball novelty print and the end panels have multi-storage pockets.

The bed runners have a total of six side pockets - 2 large, 2 medium, 2 small - so that they will be able to store books, baseball cards, stats, pens/markers - you name it! There are three pockets on each end of the runner.

The denim pocket is the large pocket and the pieced pockets (2) are the medium and small.


I hope they will enjoy them; I enjoyed making them.
If anyone is interested in the tutorial, I'll be publishing it next month. Now on to the next project. I'll be back soon!
Monday, December 10, 2012
Baking Christmas Cookies - Our Family Tradition
This past weekend my daughter, Andrea, planted herself in the kitchen the entire weekend baking cookies. Making cookies for Christmas has become a tradition in our home for over the past 10 years. Usually my daughter and I bake together from sun up to sun down one full weekend around mid-December. This year was an exception because I was not able to join her the majority of the time. Andrea had to essentially do it solo. Thank goodness she has baked along side me in previous years, enjoys baking, and is excellent at it. Since I've been working in the sewing studio playing catch up, I could not partner with her for our annual baking marathon. Abandoning the project came to mind, but because co-workers and friends have grown accustomed to our delightful baked goods, it was difficult to think about disappointing them. Andrea carried on without hesitation--she's amazing, and a trooper! (Thank you sweetie!) I did manage to contribute to baking one of the recipes.
Here's a list of what she baked: Baklava, Christmas Wreaths, Chocolate Mint Brownies, Snickerdoodles, Chocolate Covered Cracker Snacks, and Holiday Biscotti. I baked the Dulce de Leche cookies.
Here are the cookies - some just placed in a container and others waiting to be packaged -

The Chocolate Covered Cracker Snacks -

The Baklava -

The Dulce de Leche cookies -

and the Christmas Wreaths -

Each year we usually bake a lot of our friends' favorites from previous years but always introduce a new recipe or two. This year Andrea introduced the Chocolate Mint brownies and the Holiday Biscotti.
I thought I'd share one of the favorites, which is the Dulce de Leche cookie recipe from the December 2007/January 2008 issue of Sweet Ideas - a Pillsbury cookbook that I had picked up while waiting in line at the grocery store that year. So here it is:
Dulce de Leche Cookies
Garnish
1 cup flaked coconut
Cookies
1 cup butter, softened
2/3 cup sugar
2 egg yolks
3 Tbs. dark rum or 1/2 tsp. rum extract plus 2 1/2 Tbs water
1 tsp. vanilla
2 1/2 cups all-purpose flour
1 tsp. baking powder
1/4 tsp. salt
1/4 cup sugar
Filling
1 cup caramel apple dip (from 16 oz. container)
Directions:
Heat oven to 350 degrees F. Spread coconut in ungreased shallow pan. Bake uncovered 5 to 7 minutes, stirring occasionally, until golden brown. Turn off oven. In food processor bowl with metal blade, place cooled coconut. Cover; process until ground. Set aside.
Meanwhile, in large bowl, beat butter and 2/3 cup sugar with electric mixer on medium speed about 1 minute or until smooth. Add egg yolks, rum and vanilla. On high speed, beat about 1 minute or until blended.
In medium bowl, stir together flour, baking powder and salt. Stir flour mixture into butter mixture until well blended. Cover: refrigerate for at least 30 minutes.
Heat oven to 350 degrees F. Shape dough into 3/4-inch balls. Place on ungreased nonstick (not insulated) cookie sheets. (I USED INSULATED AND THEY WORKED OUT PERFECTLY??) Place balls 2 inches apart. Dip bottom of small glass into 1/4 cup sugar; press on cookies to make about 1 1/2 inches in diameter.
Bake 10 to 11 minutes or just until edges begin to brown. Remove from cookie sheets to cooling rack. Cool completely, about 15 minutes.
For each sandwich cookie, spread about 1 tsp. of the caramel dip on bottom of 1 cookie, spreading to edge of cookie. Top with second cookie. Gently squeeze until filling oozes out a little around the side. Roll edges of cookies in ground coconut.
Prep time: 1 hour, 15 minutes; start to finish: 1 hour, 45 minutes. Makes approximately 40 cookies/20 sandwich cookies, depending on the size rolled.
If anyone is interested in trying other recipes listed, I would be happy to share. You won't be disappointed!
Enjoy yourselves amidst the hustle and bustle, especially with family!
Saturday, December 8, 2012
Warm & Cozy is a Wrap
Check! Item off my list! I have finally completed the Warm & Cozy quilt. Not that I didn't enjoy working on it but after coming down with the flu I'm very, very behind schedule.
As I promised in my November 15 post, the recipient would be revealed when the quilt was done. W - w - e - e - l - l - l, the recipient of the quilt is my husband's boss, Steve. We're thanking him for providing such awesome contacts during the renovation of the attic - now sewing studio. This was my idea because if it weren't for his contacts, the process wouldn't have been as time saving, and also because I truly appreciate my new sewing space and am very thankful to those who contributed--directly or indirectly.
So here it is:
The quilt now includes rust colored strips within the border to give it a slight punch of color. I like it a lot better with that added touch.

And the label was designed to reflect one of Steve's interests, which is shooting and hunting (but not so much now?). As you can see, I blanket stitched the label on.

And here is a full view of the backing showcasing the center print panel of green and rust. I mixed it up with a wide grey/black/cream striped border for added interest. I really like the binding though, which picks up the grey, black, and off white throughout the entire quilt.

My husband and I will be giving it to Steve this weekend, if we can catch him at home. I just love surprises.
Okay back to the sewing machine.
As I promised in my November 15 post, the recipient would be revealed when the quilt was done. W - w - e - e - l - l - l, the recipient of the quilt is my husband's boss, Steve. We're thanking him for providing such awesome contacts during the renovation of the attic - now sewing studio. This was my idea because if it weren't for his contacts, the process wouldn't have been as time saving, and also because I truly appreciate my new sewing space and am very thankful to those who contributed--directly or indirectly.
So here it is:
The quilt now includes rust colored strips within the border to give it a slight punch of color. I like it a lot better with that added touch.

And the label was designed to reflect one of Steve's interests, which is shooting and hunting (but not so much now?). As you can see, I blanket stitched the label on.


My husband and I will be giving it to Steve this weekend, if we can catch him at home. I just love surprises.
Okay back to the sewing machine.
Friday, December 7, 2012
Bah Humbug!
"Tis' the season" as they say! As you may have noticed, I haven't posted in a while. Yes, it's the holiday season but also the flu season, and I was a victim--yuck! Over a three-week period, I experienced sniffles, a runny nose, coughing, chest congestion, chills, aches and pains, and other things that would be considered too much information. Through the course of it all, my To Do list, especially this time of year, kept growing. Consequently, I've accomplished fewer goals than anticipated, but I did accomplish a few.
It all started several days before Thanksgiving and after two weeks of the above, I had a relapse--bah humbug! In spite of it all, I managed to sort through my accumulated fabric scraps and put them in a three-sectioned wire basket and label the sections: neutrals, solids, and prints. My hubby helped me mount it to the side of my cutting/sewing table so it would be convenient to toss scraps in after cutting fabric. It will surely be a nice source to select from for smaller piecing projects, or maybe a scrap or crazy quilt.

I also folded and organized fabric and displayed them on a four-tiered shelf my husband custom made for a little corner in my sewing room. He did a wonderful job - don't you think? I also placed in a frame nine photos of the quilts I made over the past year, which sits on top.

And I made a Christmas ornament for a Christmas gathering my Bunko group had just this past Wednesday. I perused many craft sites and blogs for an idea and came up with this little Christmas tree. It was quite fun to make and I got to use paper from my scrapbooking supplies, which made it very nice and economical.

Because I prefer to not work on gifts and quilts when I'm not feeling my best, the Warm and Cozy quilt I had started was put on hold. (I had posted about it the post previous to this one.) Last night, however, I resumed that project and made the binding for it.

I am back in full swing but find I will be working double time from now until Christmas. Did I say bah humbug!? I know I'll soon be back in the holiday spirit once I've knocked out a few more projects. The "elf" in me will make it happen. Santa, I'm back so be ready to load up your sleigh!
Thursday, November 15, 2012
Warm and Cozy
As the Holidays approach, I find that I have a multitude of projects to do and want to do but only a short amount of time to get them completed. Christmas is only 40 days away! Can you believe it? I do keep in mind that most of my projects are self-imposed; yet and still I wouldn't have it any other way. I've got to keep it mov'n--"live life to the fullest" is my motto. My To Do list includes Christmas gifts (quilts of course), other generic projects for the home, and quilting or sewing for those requested by others. Oh and I forgot to mention I'd like to try and fit in a small project or two that will allow me to learn a few new techniques.
Anyway, what I'm currently working on is a warm and cozy quilt for a very important person for whom I will not name. This person has a very generous spirit and always looks out for others. I will stop with the description for now as I don't want to give it away. The quilt will be a gift--not a Christmas gift--and it's quite a departure from my style and color selection, and it is very masculine. I've almost finished piecing it and the colors are very, very subdued. Some might even think drab. BUT because this person is not at all pretentious or showy and enjoys the outdoors, I'm thinking that this is what he would prefer. At least I hope so?!? Gifts can be tricky sometimes - especially when giving to someone who least expects it - shhhhh!
Okay so here's a peek:


In case you're not able to pick up the colors from the pictures, each block has various shades of grey, hunter green, cream, beige, black, and if you look closely (in person), a small hint of navy. I've used various fabric textures including flannel. This design is adapted from Amy Ellis' Twisted Bars quilt design in her book Modern Basics . . . copyright 2011. I still have borders to add and then you know the rest . . .
Once this project is finished and given to the unsuspecting recipient, I will share photos once again and reveal his name. Until then, Chow!
Sunday, November 4, 2012
Sewing Studio Pictures - The Finale'
Since my sewing studio has been up and running for a little over two months and now that friends and family have been by to see it, I thought I would share photos of my studio fully furnished and decorated, if you will. With the finishing touches it now feels comfortable and cozy, yet it also fits the bill as a work environment. I am one happy quilter!
Now for the tour . . . come on in!
You are entering my creative space -

As you walk past the wall quilt (seen above), if you look to your right, this is the student area (photo below). There is a table with casters used for student sewing and for fabric cutting and crafts. I can roll it out when pinning my quilts too. As you can see, I've added storage beneath for fabric (center) and storage for students to be able to keep their sewing supplies on either side. I painted and made seat pads for the stools I found at a thrift store - aren't they cute?!

Here's the straight view . . .

Next if you look to the left of the students' workstation, you will see my little blackboard, which comes quite handy for reminders and teaching young students.


Then as you keep turning toward your left, this is my sitting area. I use it for hand sewing and watching tutorials or general TV viewing. Hubby joins me now and then when I sew in the evenings.

Next is the space where I sew. My sewing machine is on the table in the center where I also cut smaller fabric pieces, press seams, and quilt. I also store more fabric and batting underneath. My clock and my favorite saying, "Sewing mends the soul" is displayed over the large horizontal window on the main wall. I also have been sewing quite a bit lately so there are baskets of scraps on the floor. LOL


Here's a close-up of the saying.

I've got my serger tucked in the corner with all its supplies, along with a small display of fabrics on a chest just to the left of it. Also when I need to press seams, all I have to do is grab my board and iron and place it on the center table. My husband installed outlets everywhere so I can either plug the iron in the floor outlet or in any wall outlet close by.

Because this originally was an attic space there are lots of nooks and crannies, so taking a picture of the entire room from one angle is close to impossible. So if you can visualize it, if I'm sitting at my sewing machine, to my right, behind me is the office/craft area.


Now we're back to the entrance and have viewed the entire room. (To the left in the picture just above you can see part of the door frame where we entered.) So I hope you enjoyed the final tour, and I enjoyed having you.
As you know, holiday sewing is underway, along with quilt guild projects, so you'll be hearing from me on those topics in the upcoming weeks. Oh and I'd love for you to post comments--I would love to hear from you, or you send me links to your creative spaces - I would love to see them. Sharing organization, storage, and decorating ideas is great fun!
Wednesday, October 24, 2012
Meet Brian!
It's been a year now since I have taken my sewing hobby and quilting to a more serious level. About this time last year, I created a small table-top quilt with a fall theme in anticipation for Thanksgiving, and then it snowballed into me making more and more quilts--I just couldn't stop--I love it! Shortly thereafter I created this blog and joined the Kansas City Modern Quilt Guild--not necessarily in that order. Oh, and I can't forget the sewing studio renovation. As a result of that, I'm teaching sewing classes, and I'm quilting on commission as well as for pleasure. So many great things have resulted from my latest pursuits. Among these great things are the friends that I have met along the way, particularly in the guild and in the blogging community. Just recently I connected with Brian Turner, Staff Writer and toxic substance safety advocate, who posts regularly on The Mesothelioma Cancer Alliance Blog. Brian's mission is to create awareness of environmental health risks and that's how we connected. He discovered via my blog that I (actually my husband and I) had just completed a renovation and so now I am delighted for him to post his important message here and help keep us all safe. So if you are considering future DIY projects, Brian and his colleagues are a great resource or "go to" when preparing for renovation, or other safety concerns for that matter. And now here's Brian -

The primary danger spots for potential problems are the basement, the kitchen and the bathroom. Actually, the water pipes throughout the house pose a problem because of the risk of mold. Even a small amount of water leaking from a pipe will create the conditions that mold likes best. While mold is not usually considered to be cancerous, victims of cancer often finger mold as a contributing factor if not the primary culprit. What is known for certain is that mold also causes respiratory problems.
Breaking open moldy drywall releases mold spores into the air, which can infect the bronchial tubes and lungs. Some forms of mold are extremely toxic and even deadly, depending on the situation. Be careful when renovating bathroom, kitchen or basement. The two most common areas for mold to grow without pipe leaks are doors and windows, especially in the bathroom. Dealing with mold requires wearing masks and gloves. The gloves prevent mold spores from getting on the hands. The mask prevents the homeowner from accidentally breathing them.
Another potentially toxic element is the insulation that was used behind the drywall. Again, this depends where the homeowner does the work. Some insulation is toxic to humans because of particles or fragments released into the air. Insulation can also off-gas volatile organic compounds or other toxic chemicals. This is a problem regardless of whether the homeowner demolishes the drywall containing the insulation. However, opening up the drywall without the proper protection the homeowner at even greater risk.
Finally, a major risk factor for various health problems in lead, which is chiefly in older homes, particularly homes built before 1978, according to the Environmental Protection Agency. (2) Lead is typically only found in paint. The paint fragments from demolished walls and ceilings can release microscopic paint fragments containing lead into the air. These lead-containing fragments are also dangerous if they are swallowed.
In all cases, separate the area of the home where remodeling work takes place from the rest of the house. Put up a plastic barrier over the doorways of the rooms being renovated. It may be wise to set up a clearing area just outside the rooms by using plastic to create a walled enclosure. This is done with severe cases of asbestos removal. In extreme situations, outside ventilation with negative air pressure machines may be utilized to make sure that all toxins are filtered out of the air. Using this method ensures that the rest of the home is completely safe for everyone involved.
Brian, thank you for stopping by and sharing such important information with us. Please stop by whenever you would like, I'm sure we all would love to know more. Also, readers, followers, and friends, please check out
Be Careful Of Toxic Substances When Renovating
An older home is more likely to have toxic construction materials. Old homes used to be heated by boilers. Those boilers had their pipes wrapped in a paper-like substance called asbestos. Unfortunately, asbestos is highly toxic, irritating the respiratory system when inhaled, which leads in extreme cases to lung cancer, mesothelioma cancer and other disorders. Toxic products in the home can be released into the air during renovation. Homeowners must take steps to protect themselves when renovating an older home themselves.
An older home is more likely to have toxic construction materials. Old homes used to be heated by boilers. Those boilers had their pipes wrapped in a paper-like substance called asbestos. Unfortunately, asbestos is highly toxic, irritating the respiratory system when inhaled, which leads in extreme cases to lung cancer, mesothelioma cancer and other disorders. Toxic products in the home can be released into the air during renovation. Homeowners must take steps to protect themselves when renovating an older home themselves.

The primary danger spots for potential problems are the basement, the kitchen and the bathroom. Actually, the water pipes throughout the house pose a problem because of the risk of mold. Even a small amount of water leaking from a pipe will create the conditions that mold likes best. While mold is not usually considered to be cancerous, victims of cancer often finger mold as a contributing factor if not the primary culprit. What is known for certain is that mold also causes respiratory problems.
Breaking open moldy drywall releases mold spores into the air, which can infect the bronchial tubes and lungs. Some forms of mold are extremely toxic and even deadly, depending on the situation. Be careful when renovating bathroom, kitchen or basement. The two most common areas for mold to grow without pipe leaks are doors and windows, especially in the bathroom. Dealing with mold requires wearing masks and gloves. The gloves prevent mold spores from getting on the hands. The mask prevents the homeowner from accidentally breathing them.
Another potentially toxic element is the insulation that was used behind the drywall. Again, this depends where the homeowner does the work. Some insulation is toxic to humans because of particles or fragments released into the air. Insulation can also off-gas volatile organic compounds or other toxic chemicals. This is a problem regardless of whether the homeowner demolishes the drywall containing the insulation. However, opening up the drywall without the proper protection the homeowner at even greater risk.
Finally, a major risk factor for various health problems in lead, which is chiefly in older homes, particularly homes built before 1978, according to the Environmental Protection Agency. (2) Lead is typically only found in paint. The paint fragments from demolished walls and ceilings can release microscopic paint fragments containing lead into the air. These lead-containing fragments are also dangerous if they are swallowed.
In all cases, separate the area of the home where remodeling work takes place from the rest of the house. Put up a plastic barrier over the doorways of the rooms being renovated. It may be wise to set up a clearing area just outside the rooms by using plastic to create a walled enclosure. This is done with severe cases of asbestos removal. In extreme situations, outside ventilation with negative air pressure machines may be utilized to make sure that all toxins are filtered out of the air. Using this method ensures that the rest of the home is completely safe for everyone involved.
The Mesothelioma Cancer Alliance Blog to obtain additional information and articles.
Monday, October 22, 2012
Everlasting Hug
My daughter's quilt is finished, and I am anxious for her to see it. My wait, however, will be a little long today, as she has school tonight and won't be in until around 10 PM. As most of you know, I enjoy quilt making but making this one was very special. Here's why.
For the last couple of years, my daughter, as a young adult, has had her fair share of tribulations--none of which I will bore you with--but it seems no one I know personally is more deserving of a hug than she. Being her mother, one who has watched her grow up to become a fine young lady, and who is now a mother also, it's only natural that when you witness your own child going through tough times, you want to at least give them a hug as an offering of encouragement, comfort, and support. So while working on this project I had ample time to reflect on recent times, especially where she's concerned and have come to realize that this quilt will always be a hug from me, an everlasting hug!
This is Cubic Rhythm in its final form -


Well I better get started on my Halloween costume. I've got a party to go to on Friday . . . .
Monday, October 8, 2012
Cubic Rhythm
My daughter has been wanting me to make her a quilt and has been waiting patiently for months without saying a word. Finally, she couldn't stand it any longer and said, "When are you going to make ME a quilt?" I responded by saying, "Go through my books and pick out a pattern and I'll make one for you." To my surprise, she picked out a pattern that I would have never imagined she would want. An overwhelming sense of relief suddenly came over me because I was thinking, whew, I'm sure glad I didn't take it upon myself to select a pattern and fabrics--I would have totally missed the mark. The pattern she selected is called "Cubic Rhythm" from Better Homes and Gardens Easy Quilt Projects copyright 2010. I admit I was a little dismayed when she first showed it to me (I guess I had something else in mind), but I went on to ask her about the colors she would want as well. At first she said she wanted the colors similar to the Dress Form Silhouette quilt--the quilt I had just finished for my client. I then let out a small groan because while I wanted to make her a quilt with the colors she likes, I was also wanting to use fabrics from my stash. Unfortunately I did not have enough leftover fabric from my previous project. So reality set in and I compromised by using as much as I could from my stash pulling out a muted abstract stripe with greys, blues and greens, two florals --one blue and one brown, and then I purchased three fabrics: one print with browns, greys, and greens, and two solids - a dusty blue and green.
I have completed piecing the top, modifying it just a tad . . . and she likes it! Here's a preview.


I'll be back when it's finished.
I have completed piecing the top, modifying it just a tad . . . and she likes it! Here's a preview.


I'll be back when it's finished.
Tuesday, September 25, 2012
Ready for Pick Up!
My latest quilt, Dress Form Silhouette, is finished as of today and my customer will be picking it up on Friday. I'm excited and I believe she is too.
Since I last posted, quilting, binding, and making the quilt label was all that was left to do, but schedule differences seemed to be the most challenging aspect in completing the project. You see, she works evenings and because of this there was a considerable amount of waiting in between email and text messages for customer input and/or approval of the remaining tasks.
Because my client wanted a soft feel to the quilt, I did minimal quilting--only outlining the blocks and borders--and then I made a simple quilt label. The label acknowledges the recipient's service and mention is also made of my client's design input. My customer found this idea rather amusing but facts are facts; it's a custom quilt and she provided input along the way. The collaboration was a lot of fun and being a part of such a special acknowledgment made this project very rewarding.
Here's a close-up of the front:

Here's the back:

Here's the quilt label:


Now on to a quilt for my daughter . . .
Since I last posted, quilting, binding, and making the quilt label was all that was left to do, but schedule differences seemed to be the most challenging aspect in completing the project. You see, she works evenings and because of this there was a considerable amount of waiting in between email and text messages for customer input and/or approval of the remaining tasks.
Here's a close-up of the front:

Here's the back:

Here's the quilt label:

And here's a closer view of the quilting:

The recipient will certainly enjoy the softness and comfort while reading, watching television, or working on her own sewing projects.
Now on to a quilt for my daughter . . .
Sunday, September 9, 2012
Commissioned Quilt "Dress Form Silhouette"
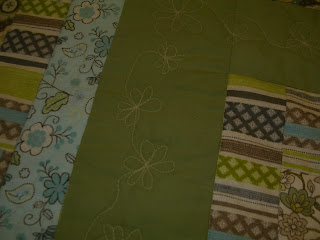
I have been commissioned to make a lap quilt for a client who is planning to give it to a special lady who started a food pantry at her church and who has brought on board quite a few church members to assist her in her efforts. According to my client, the future recipient also loves to sew and likes neutral colors, so the client and I came up with a design that will not only keep her warm but also reflects her hobby. The quilt will need to be ready by the end of the month, which is when church members plan to give it to her. I've begun the actual quilting of the layers using "stitch in a ditch," and I am pleased with how it is turning out. Even though it is still pinned and obviously there is more quilting to do, I thought I would give you a peek.

Here is a close-up of the silhouettes.

More quilting and then binding and then I'll be back to show the finished product.

Here is a close-up of the silhouettes.

More quilting and then binding and then I'll be back to show the finished product.
Subscribe to:
Posts (Atom)